May 142011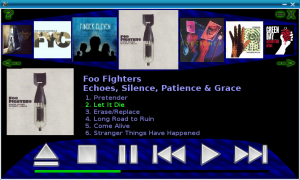 MinAmp for Pandora
Introducing MinAmp for Pandora (and desktop Linux), a minimal music player mainly designed for use as a car player. This is my first application for the Pandora. Actually it’s my first C++/SDL application. Feed free to provide feedback on this application, you can also suggest changes and features requests.
On first run MinAmp will look for the Music directory on your mounted SD cards (either “music” or “Music”). If running on desktop Linux it will look for music or Music in your home directory. If this fails to find your music for some reason you can manually edit the "minamp.conf" file but hopefully this won’t be necessary in most cases.
I have assumed that your music directory is organised so that each artist is in its own directory with each album below that in it’s own directory. In each Album directory you can have a "cover.jpg" with the album cover art. If this doesn’t suit you I’m sorry, I may entertain alternate layouts but may need some incentive ;)
At present I support the MP3, OGG & FLAC file formats, I tried WMA but track length and reliability issues made me take it out. Audio output can be sent to the default, digital (SPDIF) or Bluetooth outputs. Bluetooth on the Pandora may require modifying the .asoundrc file and has had limited testing (See the forums).
Controls:
- The touchscreen is active, and hopefully fairly obvious in operation.
- Click an Album cover to play that album.
- Click on the progress bar to jump within the current track.
- Shoulder buttons are Previous/Next track, very sensitive at the moment (probably not good for jogging but works for cycling).
- Press a letter “a” to “z” to seek to the albums that start with that letter (ie “c” for Coldplay).
- Left/Right Arrows (Nub) to move the album list left and right.
- Up/Down Arrows (Nub) are Previous/Next track.
- Enter plays the Album in the center of the list.
- ESC exits the player (Also clicking on the X on the screen).
- HOME (or “A” button on Pandora) goes to beginning of Album List.
- END (or “B” button on Pandora) goes to end of Album List.
- SPACE is used to pause or un-pause the current track.
- BACKSPACE/PAGEUP (or “Y” button on Pandora) goes to previous track.
- PAGEDOWN (or “X” button on Pandora) goes to next track
- Numbers keys 0-9 will select tracks (eg Press 1 for track 1 and then again for track 11)
If you exit the player while it is playing a track, on next use it will try to start from the same track.
Possible Future Enhancements (Keeping in mind it is supposed to be a minimal player):
- Random Play
- Album Queue
- Options to make Shoulder buttons less sensitive, (Maybe double click or hold for next Album)
- Fix some issues with the resume track function.
I still consider this software to be an Alpha release, features and functionality may be changed, added or removed. Enjoy and don’t hesitate to provide feedback and comments below.
To download MinAmp for the Pandora please go to the Pandora Repo (and don’t forget to vote ;) )
For Linux desktop/netbooks you can download the 32 and 64 bit versions here (Sorry no Windows version yet, may or may not happen)…
MinAmp 0.31 for 32 Bit Linux (x86)
MinAmp 0.31 for 64 Bit Linux (x86_64)
MinAmp 0.31 for 32/64 Bit Linux (Manual Install)

MinAmp is licensed under a Creative Commons Attribution-NonCommercial-NoDerivs 3.0 Unported License.
Jun 242010 I wanted to set up the Pandora so I could develop C++ programs directly on the unit rather than using a cross compiler. I am also installing the SDL & OpenGL ES libraries. Until a PND package is produced this is what I have done to install the development libraries. You need to use a terminal to issue the following commands and then either issue these commands prefixed by sudo or login as root using su.
opkg update
Update is important to do first to make sure the package lists are up to date. Under no circumstances do a opkg upgrade, trust me on this. If you do be ready to do a firmware re-flash.
opkg install gcc gcc-symlinks gcc-doc make make-dev binutils-dev
opkg install cpp cpp-symlinks
opkg install g++ g++-symlinks libstdc++-dev
opkg install libgles-omap3-dev
opkg install libsdl-1.2-dev libsdl-gfx-dev libsdl-image-1.2-dev libsdl-net-1.2-dev libsdl-ttf-2.0-dev
OK, this is the tricky one, OpenPandora have patched the libsdl-mixer library, so there is no equivalent -dev library, for the mean time I am forcing the installation of the Angstrom library, you will notice the nodeps flag. So far I haven't seen any problems with doing this, your mileage may vary. I will be coding an application that uses sound (portable music player) so we'll see how it goes.
opkg nodeps install libsdl-mixer-1.2-dev
You can write your code using nano or vi in the console or use the GUI application Mousepad. I suggest creating a directory for programming on your SD card. Then in a console you can compile and run your applications. In a follow up post I will show how to write a Hello World program on the Pandora using some SDL and C++.
Have Fun :)
Jan 142007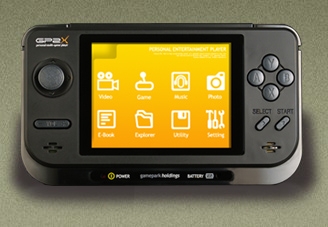 Here is a simple script for converting video files for use on the GP2X, videos are scaled to 320×240 to save storage space. No error checking is included.
In a Linux console cut and paste the following code into a file and call it say gp2x-convert:
#!/bin/sh
if [ -z "$1" ]; then
echo usage: $0 source_video_file gp2x_dest_file.avi
exit
fi
INFILE=$1
OUTFILE=$2
echo $INFILE
echo $OUTFILE
/usr/bin/mencoder “$INFILE” -o “$OUTFILE” -ovc xvid -xvidencopts bitrate=320 -vop scale=320:240 -oac mp3lame -lameopts abr:br=128
Make the script executable and then run it as shown in the following example:
chmod +x gp2x-convert

./gp2x-convert sourcefile.avi destfile.avi
I would appreciate your feedback if you have comments, corrections or additions to this article, Thanks.
Jan 042007My new toy is the GP2X, a linux based handheld multimedia device. It’s an awesome little device. If you want to know more about the features of the GP2X click here.
Below I have detailed the steps I made to make life easier when using the GP2X with Mandriva Linux 2007.
The GP2X can act as a standard USB storage device, allowing you to drag and drop files just like you do with a hard disk. This is good but using the USB Network feature of the GP2X is much more useful and once setup a lot easier to use. As an added bonus you can still use the GP2X while it is connected and transferring files.
Before beginning see this article at http://wiki.gp2x.org/articles/u/s/b/UsbNet_on_Linux.html and follow the instructions under “Troubleshooting”. This will make your GP2X compatible with the 2.6 Kernel of Mandriva 2007. (This step may not be necessary, but until I did this the network would lock up).
To setup the GP2X end go into “Setting” from the main menu, then select “System”, make sure “Menu Extension” is on. Scroll down to “USB Network”. Make these settings…
USB Network: Always On

IP: 192.168.0.2

FTP,Telnet Server: Always On

Samba Server: Always On
Press “B” to save the settings, there may be a slight pause while the network starts.
To setup the PC end, first create a file called “gp2x.rules” in /etc/udev/rules.d containing the following lines
# Experimental rules to automatically bring up usb0 when the GP2X is connected.
ATTRS{configuration}==”CDC Ethernet”,ATTRS{product}==”RNDIS/Ethernet Gadget”,RUN+=”/usr/bin/gp2x”
Now create a file in /usr/bin called gp2x and make it executable. (ie chmod +x /usr/bin/gp2x), with these contents:
#!/bin/sh
echo $ACTION-`date` >> /tmp/gp2x-status
if [ "$ACTION" = "add" ]
then
/sbin/ifconfig usb0 192.168.0.1 192.168.0.1
fi
Now plug in and switch on your GP2X, if all goes well in a short while you should have a network interface called usb0, check this by issuing a /sbin/ifconfig command. Now to access your GP2X you can run “telnet 192.168.0.2″, login as root, default is no password.
You can also access the GP2X samba share by running konqueror using the address smb://gp2x or open up straight into the sd card using smb://gp2x/gp2x/mnt/sd.
I’ve added two icons to my desktop to make life easier. (Right click on the desktop and select New). The first icon is an “Link to application” called “GP2X Console” which runs “/usr/bin/konsole -T GP2X -e telnet -l root 192.168.0.2″, this automatically opens up a console and logs you in. The other icon is a “Link to URL” which is called “GP2X Network” and has a location of “smb://gp2x/gp2x/mnt/sd”.
Here are the icons I used for the links:
 This one for console. (Thanks to Paul for this icon, see http://dl.openhandhelds.org/cgi-bin/gp2x.cgi?oovxdnowromm,0,0,0,8,1960 )
 and this one for network, which I modified from the above icon.
Hope this helps. Now if someone can show me how to automatically display and remove these icons on the desktop when the GP2X is plugged /unplugged that would be great. I would appreciate your feedback if you have comments, corrections or additions to this article, Thanks.
